
This is a compilation of resources focused on Blender and aimed to show you things that might or might not be mentioned in that tutorial series you’re watching or that class you’re taking but will be very helpful along the way and pointing you in the right direction to find what you need to know if you want to learn how to do 3D art.
P.S. It doesn’t matter what software you use, you will still find some good resources here. Most of 3D art practices are universal among programs, just the technical way to do it is different.
Where to start
If you’re eager like myself to dive in to the practical parts before anything you might find yourself bumping your head a lot with “I wish I had known this sooner”. In order to avoid that it would be a good idea to familiarize yourself with what the full workflow of 3D is and a lot of the resources I’ll be sharing here. Knowing this might even help you figure out which is the part you’re most interested in and make it easier for you to start learning. There’s a really good article for this by Christine Garner. I recommend to give that one a read, once you understand what she’s talking about then the things that I’ll be gathering here will become more relevant to you.
I also wrote this other post that goes over the settings I recommend for Blender, they’re best to set up as soon as possible so you learn with them active. And this other post I wrote for people transitioning from Maya to Blender.
What programs to use?
The question that is posted many times a day in many different forums. The answer varies depending on what you’re looking for. I personally love Blender and I’ll preach the love for it.
Maya and 3DS Max are the “industry standards”(this is starting to change, and the more people use Blender the faster this will happen) made by Autodesk. They are super expensive, crash a lot, receive very little updates, and have less features than Blender. I started with 3D by using Maya for two years, also tried out 3DS Max, I avoid them like the plague now that Blender has illuminated my life.
Zbrush is loved by many sculptors — I personally have stopped using it all together and do everything in Blender now that its sculpt tools are improving so much (I recommend to look at what Pablo Dobarro is up to) and I can avoid switching between different programs.
CAD programs are more technical and I personally would only recommend them for engineering.
Houdini is also gaining traction, I haven’t personally used it much yet but I definitely want to, this will be of interest mostly to technical artists.
Why is Blender great?
- It’s free and open source
- Updates often and you’re free to try the beta and alpha versions
- Has modifiers!
- You can do the whole workflow in one place: modelling, rigging, texturing, animating, simulations, shaders, rendering, and compositing. You can even do 2D art thanks to the grease pencil.
- It’s non-destructive: you can modify the model after you’ve rigged and animated without any extra steps
- It’s quickly getting its spot as an industry standard
- There’s so many free resources online and a big positive community (I list several at the end of this article)
- Lots of shortcuts and customization options that make life easier
- Blender is love
Speaking of shortcuts, have you seen this super cool info-graphic made by Giuliano for Blender 2.8? (Full resolution here, it gets constant updates too)
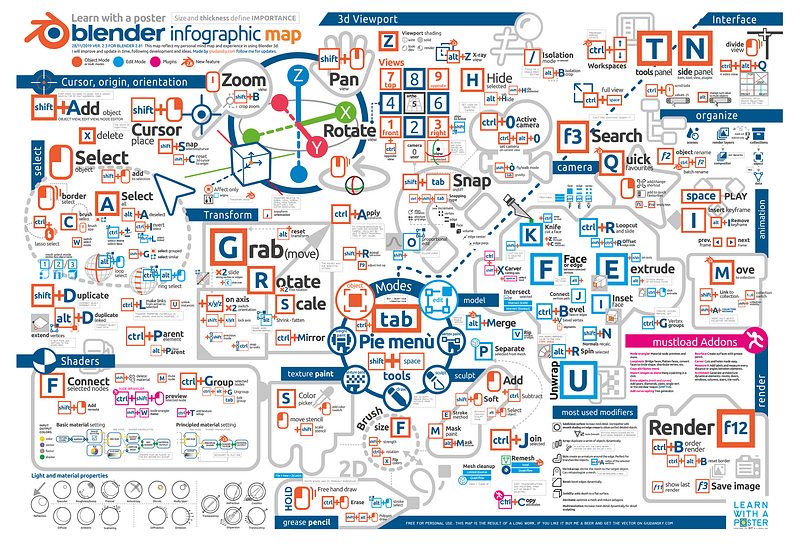
It might look like a lot but all you have to do is think about what you’re looking to do and find the category (white text, blue strip), once you follow a couple tutorials you’ll have a better grasp at it and an easier time finding what you need. With practice you’ll memorize them without having to think about it, your hand will just do its thing, but you got to try to use them instead of the menus. Future you will thank you a lot.
If you’re really really new and are looking for your first tutorials head on to this video and/or CG Cookie and then come back here once you’ve made your first model. I recommend to avoid Blender Guru.
Exporting / importing
Most of the time you’ll be able to import/export your creations from one software to another but there are a few examples of the formats you can export with, it all depends on what you’re planning to do with it.
FBX format:
- Exporting to a video game engine (like Unity or Unreal)
- Static or animated models
- Supports separate objects (objects can have several meshes) and blend-shapes/shape-keys, it can even export lights and cameras
- Different materials
- Favorite for most 3D purposes
- Wary that it can be binary or ASCII. Non-Autodesk software (like Blender) tend to only support Binary FBX. This is thanks to Autodesk’s greed.
OBJ format:
- Only static models and it’s all one object. No rigs, animations, lighting… nothing but the model itself
- Creates a separate MAT file where it stores the material information
- Older, slower and bigger file size
- Recommended only when it’s necessary (like importing in Zbrush)
STL format:
- Recommended mostly just for 3D printing purposes or similar
- Only saves the mesh itself; no material, texture, animation, nothing else
Things to keep in mind:
- If you import an animated/rigged model as an fbx you’ll be losing the controls, you only get the bones and IKs, the rig must be set up again. Rigs must be animated in the same software they were made in.
- You can’t export simulations or particle effects.
- Different programs produce different renders even if “the settings are the same”. A program can have different renderers, Blender for example has Eevee, Cycles, and Workbench.
What do you need
- A computer that can handle the program of your choice (Blender’s requirements) and hopefully a mouse. I’ve seen some people try this with a track-pad and… my respect to them! You don’t need a drawing tablet unless you want to avoid pain while sculpting; if you don’t sculpt or do 2D art then you don’t need it. I’ve also seen people do amazing sculpts with no tablet, it’s just like hard-mode.
- Motivation — beginning to learn 3D is hard, it is a lot to take in and at first you might feel like you’re not progressing as fast as you hoped for. You’ll need to push through that, it’s totally worth it.
- Get used to look up things you don’t understand before asking in a forum/community, chances are someone has already asked the same question before, this way you’ll receive answers much faster and save everybody’s time. If you don’t find your answer then feel free to ask and people will happily help.
Different paths
3D art can be used for many different purposes and each have their own way of doing things, the most common are:
- Rendered animation (like movies or shorts)
- Video games
- 3D printing
- Product renders
- Illustrations
Modelling
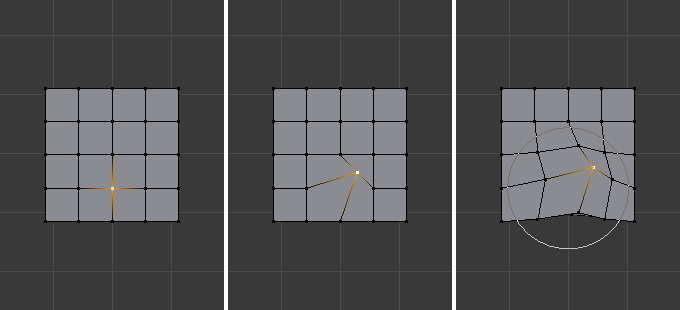
One word you might not be too familiar with yet is topology, and it’s a really important one. Here’s a nice and short video explaining it that Christine mentions in her article that I linked at the beginning:
Here are two more pages that are great resources to understand topology well and how to work with it: simple and more in depth.
The only time clean topology will be unimportant is while sculpting and when modelling for 3D printing. But having a good topology will make it much easier for you to work and edit the model, so if you’re vertex modelling (not sculpting) you might want to keep it clean to make your life easier.
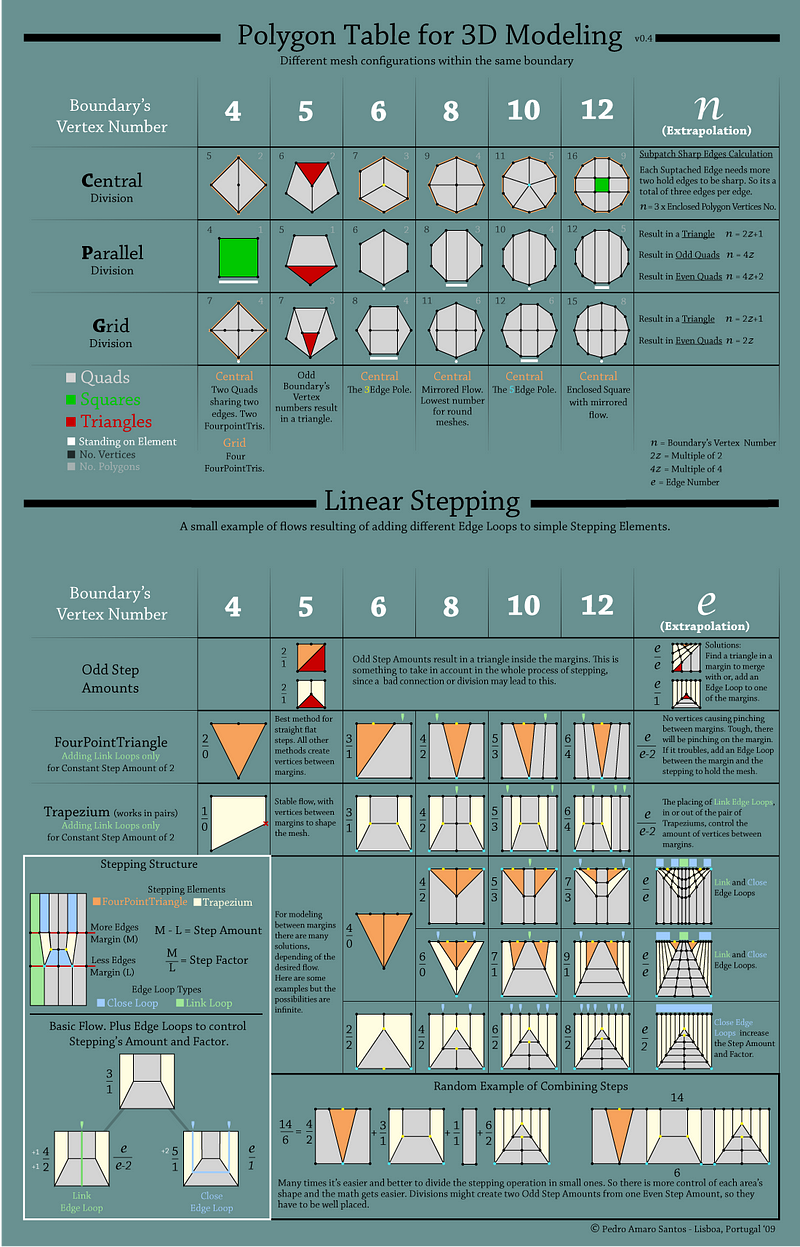
This guide for how to have clean topology by Pedro Amaro can be really helpful. (Full resolution here)
If you have never heard of n-gons or are confused why they should be avoided: here’s a good explanation.
Now, normals. These are something that every 3D artist should understand, doesn’t matter what you use 3D for. Note that they are not the same as normal maps, normal maps (text / video) will replace the model’s normals, but if you don’t have a NM then this is what you need to do. This video explains them very well I think:
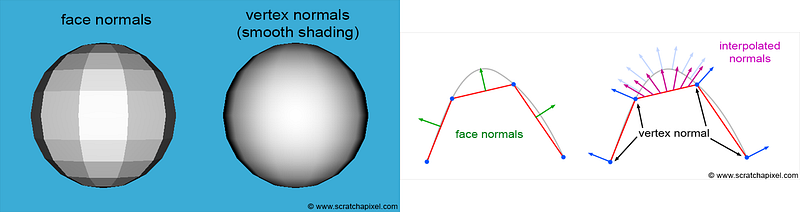
Chances are that you’ve already encountered problems with faces behaving in weird ways and that the solution is to fix the normals.
All faces are made of tris, even if you don’t see the edges, triangulation happens regardless. Exact reason why you should avoid the n-gons.
Other things that are really important to know about:
- If you’re going to model characters: study anatomy. The flows of the muscles help mark how the topology flows, and without doing anatomy studies you’ll find that your characters fall into the uncanny valley. Seriously, even if you’re doing cartoony characters, it is important. Look for “3D anatomy studies” pictures and you’ll see what I’m talking about, it’s not about just reading books.
- When low-poly modelling: if a vertex doesn’t help for the silhouette or functionality of the model then take it away. Every vertex counts.
- When high-poly modelling: try to keep a vertex count as low as it possibly can be and do most of the smoothing with a smoothing modifier that you can turn on/off. It’ll make your life easier. Get the form in low poly first and then add to it as you deem necessary, starting with too many loops will make your life unnecessarily harder.
- Use references. For everything. All the time. New artists often fall into the thinking of: if I don’t use references then it means I’m getting better, they could not be more wrong. Ask any professional artist and they’ll tell you to use references. The more references you use the better.
- To bring a 2D image into 3D you can use vectors (SVG), you would need another program like Inkscape (free) or Illustrator to make the SVG file.
- You really need to look into modifiers if you haven’t yet, they’ll make your life so much easier. Yes, even the ones that look complicated.
- If you don’t know about Beautify Faces yet, you should.
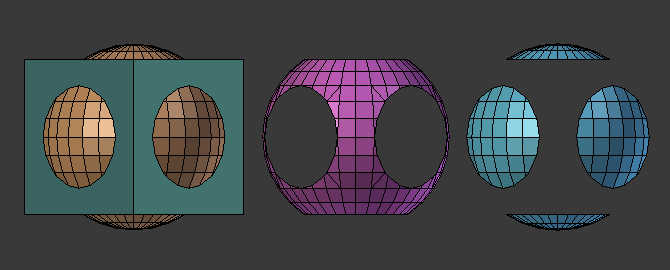
Booleans
Booleans are a really useful and important tool to know about. Some of those details in models that you’ve wondered: “but how do I do this?” can be solved with booleans. Instead of extruding into the object that you already have and adding random vertices, create a new object with the form that you need and then use booleans. Learn to keep them in your mind and use them, they’ll save you hours of work.

3D printing
Modelling for 3D printing is different than doing it for any other purpose, this is because there are some things to take into account, for example: models need to be manifold.
Things cannot be flying, they need to be connected to something or start from the ground. Just like things built in real life (the printer is creating it from the ground up and gravity will affect it) they need to have supports if they’re hanging out.
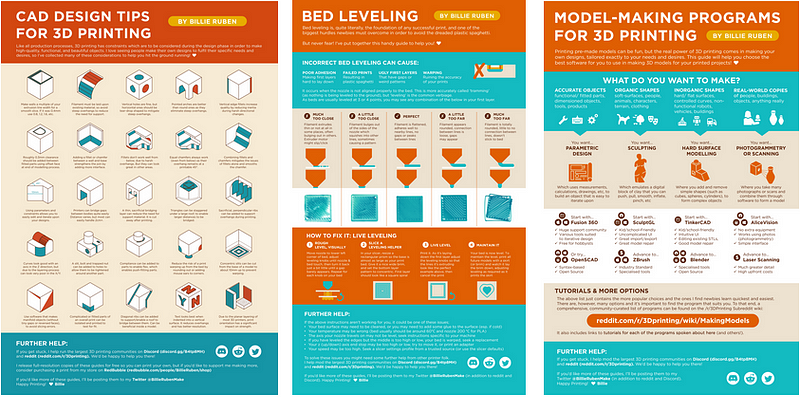
Billie Ruben made these info-graphics for 3D printing, totally recommend to check them out.
Texturing
Texture baking
Mostly used to make a low poly look like a high poly.
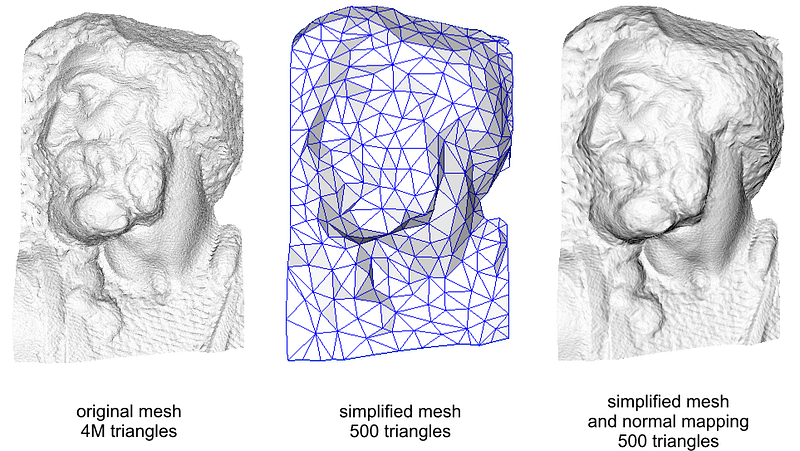
Normal maps explained in a video. But we also have bump maps and displacement maps (this article also explains normal maps), although these two are less used/popular than normal maps, they’re important to understand. Displacement is used in video game development.
Understanding normal map baking (old post, the steps for doing it is slightly different in Blender 2.8 but the workflow is the same)
Here’s a step-by-step guide on how to bake textures in Blender 2.8
Baking is not only for normal maps, it can also be used for coloured textures and ambient occlusion, there’s more uses but those are the most common ones.
Different programs will give you different results; you can bake in Blender or Substance packages, and here’s a list of many others.
Most used programs for texturing
- Substance Painter: paint on several channels (color, normal map, metallic…) at the same time with brushes, masks, pre-made materials… This is the game industry’s favorite
- Substance Designer: make textures on several channels using nodes (no painting in here)
- Substance Bitmap2Material: create materials out of pictures
- Photoshop: you’ll only be able to paint in one layer at a time, if you’re only using a color map and one other it should be fine, but generally you will want to avoid double-work.
- Photopea: web replacement for Photoshop. It can do almost everything Photoshop can with almost the same shortcuts. For free with tolerable ads.
- Blender: it is limited but easy and free, basically a painting tool: no selection, moving, layers [unless you download an add-on]… just paint.
- MaterialMaker: open source and free replacement to Substance Designer.
- ArmorPaint: open source software where you can paint and work with nodes. Haven’t tried it but seems really good, definitely worth a shot.
- Mari: seems to be the Substance Painter for the film industry.
If you’re looking for what software to use this might be of some help.
Finding good textures
When you’re bringing existing images that will be tiled into your model you must make sure it’s a seamless image (I really recommend to check that linked article out if you’re not already well familiarized with the process).
Here’s some websites for finding textures:
- Free textures: Where to get 3D textures for your artwork
- Top 6 sites that offer free textures
- 10 resources to find free textures
Here’s two that you should totally check out:
- GameTextures (lots of game-ready materials)
- Substance Share (free goodies for Substance packages)
I personally first google whatever texture I’m looking for plus “seamless” (if I’m looking for stainless steel I’ll google “stainless steel seamless”) and then if I don’t find anything good I’ll go into these websites and look through them. While I’m doing this I always keep in mind the things mentioned in the article I linked earlier about seamless images, this is imperative or it’ll look ugly.
I also have saved my own collection of textures that I’ve reused many times saved to my pc, it’ll save me having to look for them every time I need them.
Rigging
Shape-keys (called blend-shapes by Autodesk and Unity)
These are mostly used for facial expressions and corrective blend-shapes (link is for Maya but the explanation is good, just ignore the tutorial part).
There’s also this other video that I think explains it better, faster, and with more relevant content but it has a butt on it (not sexualized, just regular anatomy), so just a light NSFW warning. They have a good library of short useful tutorials, but most of them use a naked female model (just trying to keep this SFW).
Drivers:
Ways to automate animation — move several things with just one controller. It can be used for almost anything, like shape-keys or material values for example.
Downloads
Here are some really cool free Blender rigs! Thanks to Blender Cloud!

Massive catalogue right here!
Free Maya rigs, thanks to Christoph Schoch.
Animation
There are 12 principles of animation and they are the foundation for any animation to look good, fluid, and natural. If you’re interested in animating, even the simplest thing, you need to take a look at these.
Here’s an article that explains the 12 principles
And here’s an article that explains them and how they’re applied in video games
Animation curves
These are super important to any 3D animator. Weirdly enough I didn’t find much material on them online but I found this video:/media/b656284e363f6a496ad420a5e9170113
It’s much better to animate with as less key-frames as possible and fix the interpolating issues with curves, it won’t only make your life easier, it will also make it look much better. Never forget: curves are really important.
More resources / communities
Blender’s YouTube channel (so many goodies here)
BlenderArtists (Blender community)
BlendSwap (everything here is free and good quality!)
Itch.io (games, game assets, game jams… everything games!)
Sketchfab (free showcasing of 3D models, in 3D! and asset store)
Artstation (community known for it’s hardcore art)
Blender Market (there’s free and paid assets)
CG Trader (3D asset store & freelance projects listings)
Archive3D (lots of free 3D furniture)
OpenGameArt (free art of all kinds)
TurboSquid (one of the oldest stores)
HighEnd3D (another store that’s been around a while)
ForgeHub (3D asset store)
11 Second Club (11 sec audio clips for animators)
— There’s more stores and free download websites here —
— — — — — — — — — — — — — — — — —
These are the resources that I think are the most useful and easy to miss while starting out. If there’s anything else that I missed and you think should be in here please let me know and I’ll consider adding it 🙂


i’m gonna say this right now, but this blog post has been invaluable since i finished my first class in Maya. Grateful i stumbled upon your blog in my class. Like, having links and various resources will be invaluable for those who are able to get here with Bing’s search engine (i was using Google to try and find this post again, but had to retrace my steps carefully with Bing).
**If ever able to go back and update the blog, would edit the font color since the tinted grey letters on a shaded grey background is straining on the eye. That’s it.
Thank you Evan! That is really nice to hear, I’m very happy it’s been of help 🙂
I’ve tweaked the text and background colors, I hope this is easier on the eyes!