In this post I’ll show how some functions translate from Maya to Blender for those that are thinking of or already making the switch to hopefully help a smoother transition.
I recommend taking a look at this other post I wrote where I go over some Blender settings that are good to know about.
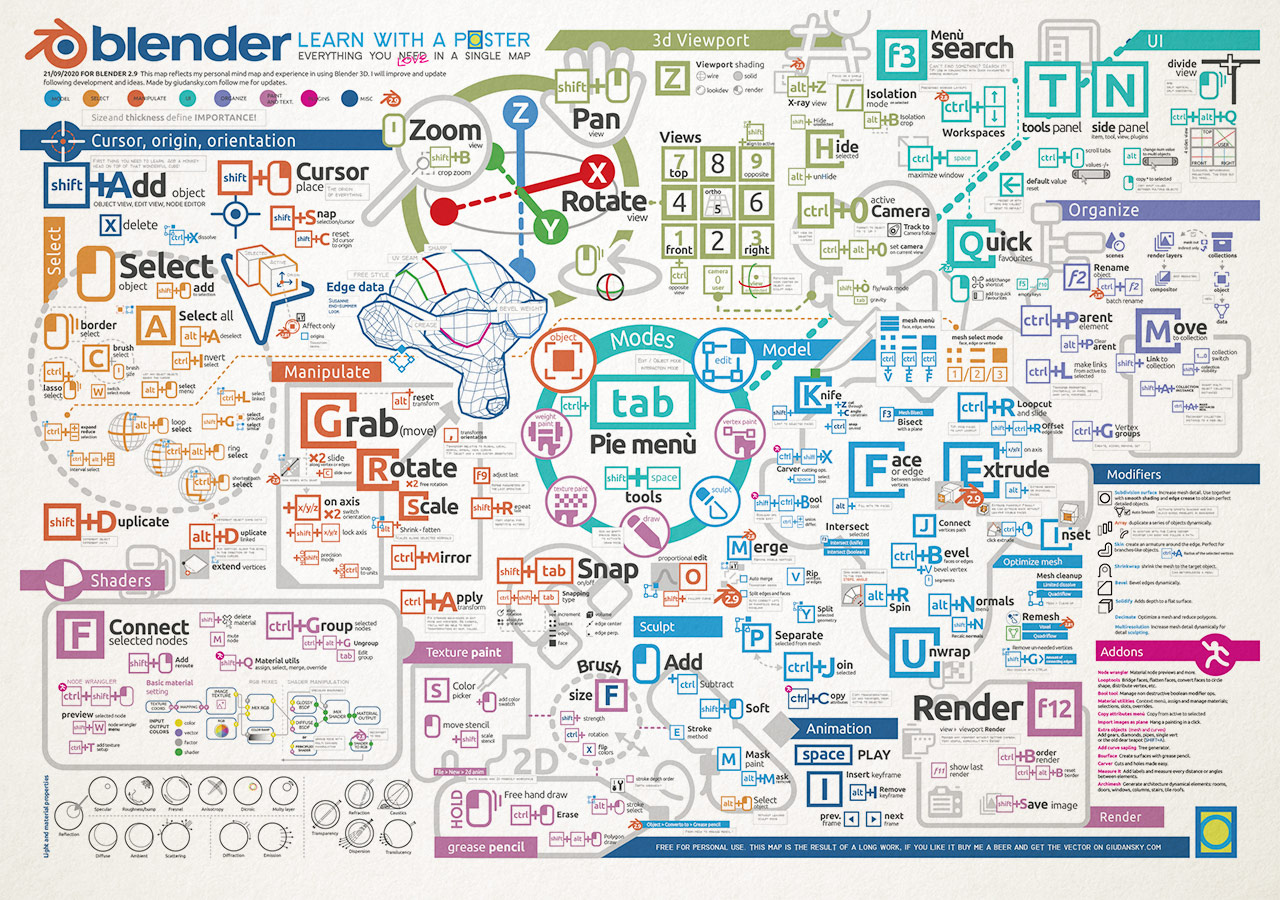
Also I mention this in every introductory post about Blender I write but I believe everyone starting on Blender should see it so I’ll just keep showing this amazing poster (that gets constant updates) by Giuliano D’Angelo. It might look overwhelming at first but if you go through it you’ll find it’s organized in categories so it’s easier to find what you need.
Tutorials
In my Resources for beginner 3D artists – focused on Blender post I link to a bunch of different tutorials and resourceful websites, including several free rigs.
Here’s a good overview on the differences and similarities between Maya and Blender’s layout (it starts at 2:14)
General
Maya’s history system? Outdated and a big pain in the butt. Forget about it, no such thing here.
You know how in Maya it’s a big pain to modify a mesh that’s already rigged? Not here! You can modify whatever you want whenever. Non-destructive.
The view-port/area that your cursor is in is the one that will get affected by your shortcuts.
You also have different modes here (ctrl + tab) depending on what you want to do (rigging, modelling, texturing, etc). For switching between vertices (1), edges (2), and faces (3) you use the numbers above QWERTY. The numbers on your numpad (can be emulated if you don’t have one x) are shortcuts for your view-port camera. Just writing this I realize that the shortcut for selection indicates how many vertices it needs! 🤯
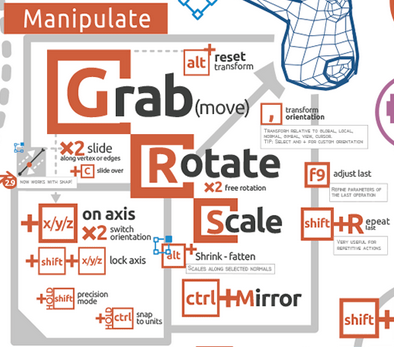
The best way to manipulate things in 3D is by not using gizmos. It might make you slower while you learn but trust me: it will pay off! Take a look at the shortcut sheet I shared above:
1. Press what you want (Grab, Rotate, Scale)
2. Press the axis you want (if you want two axis then do shift plus the one you don’t want)
3. Move your cursor around OR you can even input the amount you want, like just type 90
4. Press Enter or left click, right click will cancel.
Delete things with X.
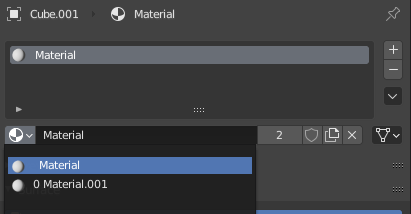
Blender works with data blocks, this lets you easily share data between objects without the need for individual duplicates so that you only have to update it once if you’re using it in several places. It is very important to understand this or it could cause you to lose hours of work. It applies to textures, animations, meshes, materials, basically everything. You see that number 2 by my Material? That means that it’s being used by two objects. If a data block is not being used by anything at all it will have a zero and that means that if you save your file and open it again that will be completely gone. The only way to make sure data is not erased even when not in use is by clicking on that little shield to the right of the number, this is called fake user. If there’s no number then it means that’s the only instance in the scene. If you want to delete a data block then you have to make sure that no object is connected to it (shift+click the X), you will know that something will be deleted because it will have a 0 before its name in the list. Textures should always be saved to an external file (png, jpg…).
You can reference from other blend files too, in File > Link. If you do File > Append then it brings over the data block but it’s an individual copy, not linked.
You can Apply Transformations by pressing ctrl+A while in Object Mode. And create new objects with shift+A, this menu is dynamic and will change depending on what mode you’re in.
You can also press alt+G to reset objects to their origin position, alt+R for rotation, and alt+S for scale.
You can duplicate an object by pressing shift+D and create an instance of the mesh by pressing alt+D, this is called a linked duplicate. It means that there’s two objects (that can have different materials, modifiers, transformations, vertex groups…) but will share the same mesh data.
Blender has auto-save turned on by default, even if you haven’t saved your file yet you can still recover it by going into File > Recover > Auto save. I recommend going into Preferences > Save & Load and making sure the settings work for you.
For basically any operation that you make there will be a little window (might be “minimized” or “closed” by default with a little arrow to open it) that pops in your bottom left corner of your viewport and in there you can access extra options. Similar to what you would have as history in Maya I guess:
You can drag and drop images right into your viewport to use them as references, they’ll be a regular plane so you can use the knife on it to do a cut out.
Modelling
Modifiers:
One of the most beautiful things about Blender is how non-destructive it is. And a big part of that is thanks to its modifiers.
The ones that I personally use the most are:
You can do most of them even without having to use modifiers and just directly in edit mode but I always prefer to use them because then I can turn them off/on with a single click. I totally recommend to watch that video that explains all of them though, they are incredibly useful.
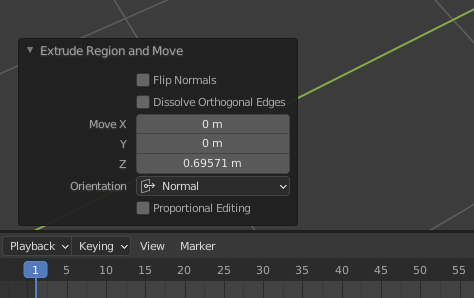
Press E for extrusion, ctrl + V while selecting an edge is a manifold edge extrusion.
UVs
Blender’s UV system has a not so great reputation but it’s much better than most people expect.
To create UV islands select the edges in your mesh where you want the seams and do ctrl+E and Mark Seams.
You can have the UV menu by pressing U, here you can do the different unwraps.
I recommend to familiarize yourself with the system first and then if you feel it’s lacking there’s some really good add-ons to make it better. I personally like UV Toolkit for UV manipulation and UVpackmaster for packing but honestly I just started to consider buying add-ons recently. I’ve used either vanilla, free ones, mine, or just the already included ones for most of my experience.
In the top left corner there’s this button with two diagonal arrows, this lets you sync your selection between the UV editor and your 3D viewport.
Texturing
Blender has a texturing mode which is okay mostly for low-poly things or quick prototypes. It doesn’t have layers, but you could add the functionality through an add-on (LayerPainter is going open source it seems).
You can texture using nodes through your shader and then bake it to textures. For baking you need to use the Cycles renderer.
Rigging
In order to bind a rig (called armature in Blender) you just have to add the Armature modifier; weight painting is stored in vertex groups (which are used for more than just weight painting). The vertex group should be called exactly as the bone. If you select the mesh first and then the armature and press ctrl+P you can do the binding with several options to choose from like automatic weighting or just creating empty vertex groups. If you rename a bone that already has vertex groups assigned to it in an active rig (with the modifier) then the vertex group will be renamed as well automatically, this doesn’t work the other way around though.
Normalization of vertex groups is turned off by default (and I highly recommend to keep it this way, personally) but you can turn it on.
You don’t need to have controllers for bones, the bones themselves are controllers. But you can also create some nice curves/meshes that serve as bone visualization, for this you use a custom shape.
Bendy bones are a great to have one bone behave as if it was subdivided when using in an IK.
The Hook modifier is a must know for riggers, I use them mostly to control spline curves.
You don’t need many meshes lying around to create blendshapes (called shape-keys in Blender), they’re stored in Object Data Properties.
Animation
You can have as many timelines as you want! They’re called Actions in here (these are affected by Data Blocks so make sure you read about those or you could lose hours of work, I talk about them in the General section of this article). And as long as the bones are named the same way you can put it in any rig (called armatures in here) you want. You do this by selecting the object that you want to play the animation and selecting the Action in the Action Editor – inside Dope Sheet editor. This means that as long as the rig has the same name in the bones you can mix and match meshes and rigs with like two clicks.

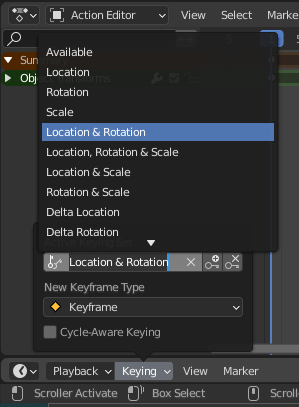
You have to select what you want to be creating keyframes for in the Keying menu (bottom left corner, like in the screenshot below). Once you’ve done that you can create keyframes for your selection by pressing i while your cursor is in the 3D viewport. You can also create keys for modifiers and even materials, try right clicking on editable values and they will most likely have an Insert Keyframe option.
You use the same keyboard shortcuts as in the viewport to move (‘G’) and scale (‘S’) keyframes, just make sure you have your cursor over the Action Editor screen. Scaling is a good way to tweak timing by selecting several keyframes, you can select using ‘B’ for Box Selection.
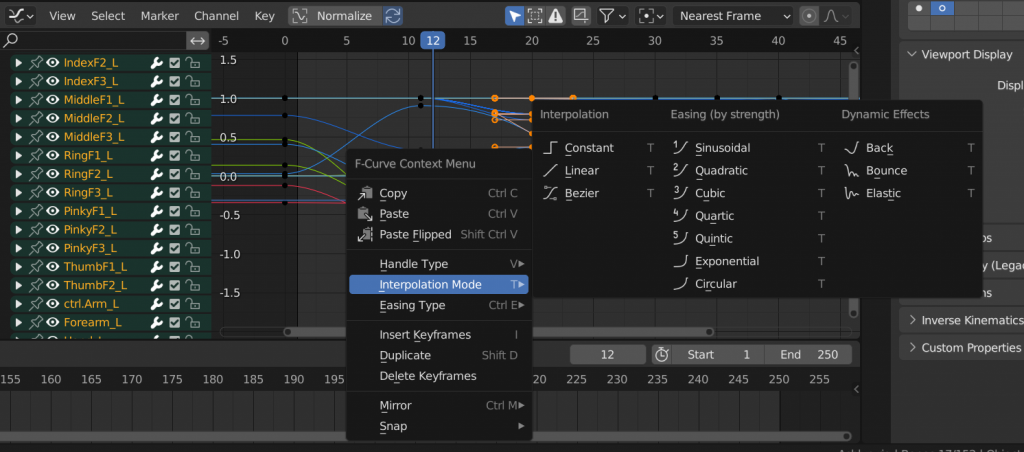
Pressing ‘W’ brings up this menu where you can set several options for each keyframe like easing and interpolation modes.
If you think there’s something else that would be helpful to add here do let me know 🙂
P.S. Banner pic from here.