In this post I’ll do a breakdown of an effect I made for Genpop’s Slimecore last year.
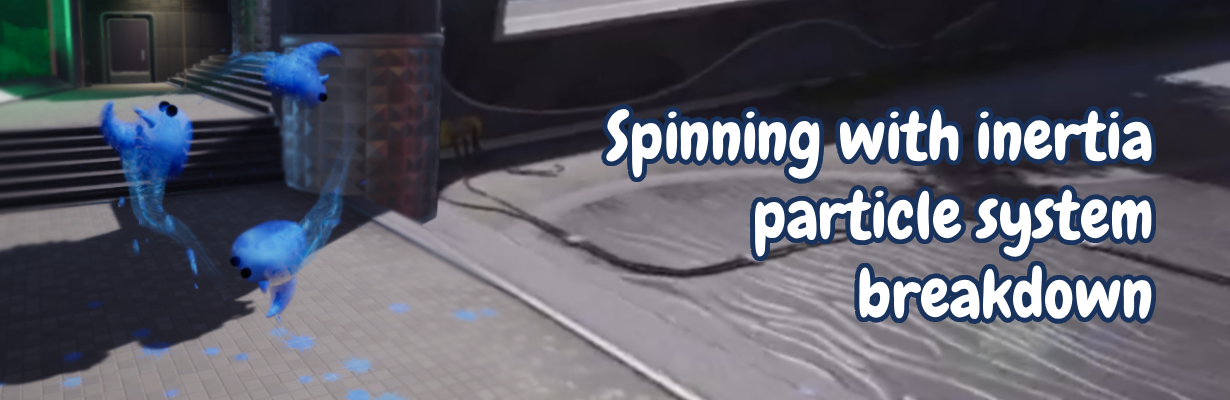
Here is how the ability Slime Dash looked like using this technique:
(video link: https://vimeo.com/1181394471)

This is how my Niagara system looked like for that video:

This is a medium level system and this breakdown is written with the assumption that you are already familiarized with creating Niagara systems and navigating Unreal.
First lets create some System parameters, Speed and Turning. We will need to create other parameters in the process.
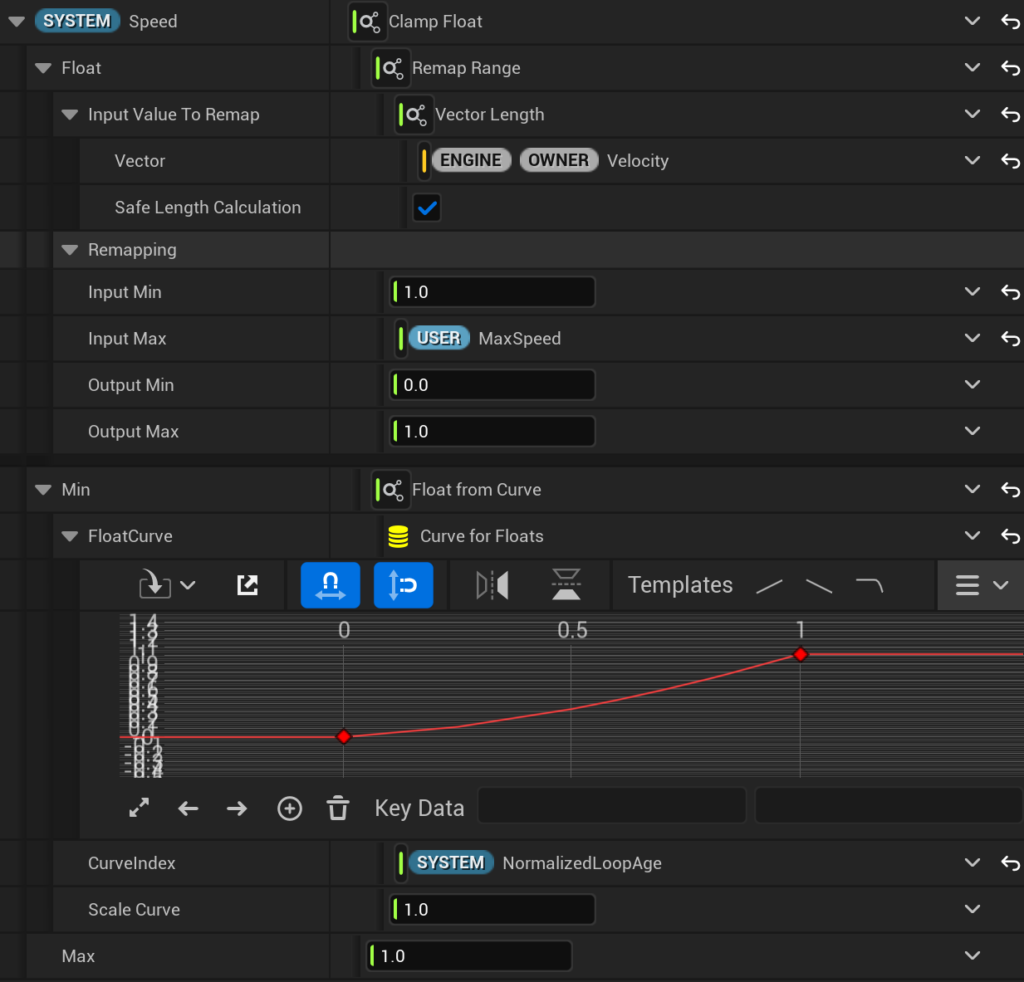
In System Update we will create a new module to set a float parameter that I’m naming Speed. I’ll be clamping and remapping the velocity length, setting the Input Minimum to 1 and Input Maximum to a user parameter I’m naming MaxSpeed. This will normalize our speed to something we can easily use.
In the minimum value of this clamp I’ll be using a curve that grows from 0 to 0.5 with the NormalizedLoopAge as curve index.
If you wanted to have a completely dynamic speed then you don’t need to clamp but I want this to pick up speed as the effect ages. If you wanted this to be an infinite system then you should skip the clamp and only do the Remapping.
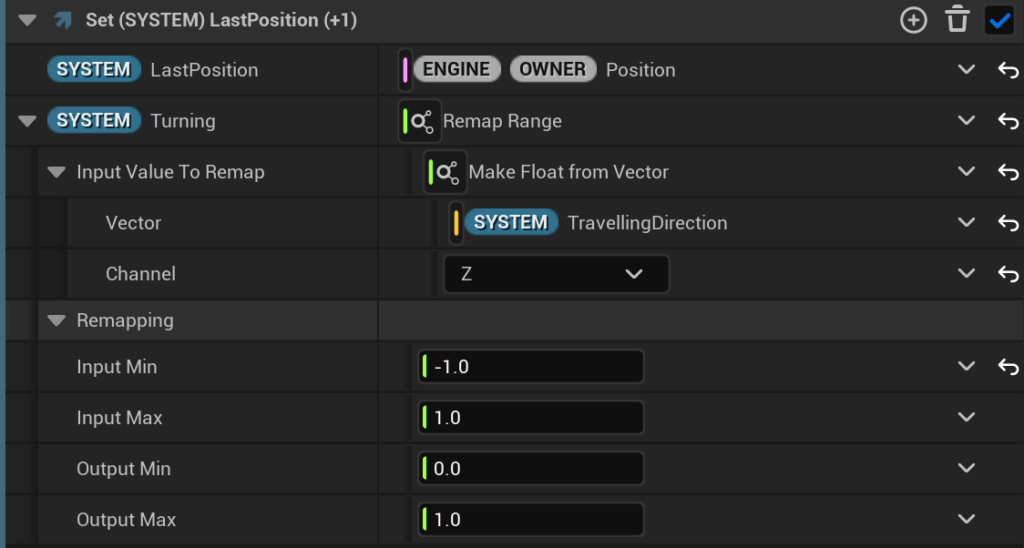
In this same module we will add another parameter, this time a vector I’m naming TravellingDirection.
We will normalize and transform the subtraction of LastPosition – a vector System parameter that we will set in System Spawn to use the Engine Owner Position – from World to Local space.
This will allow us to know in which direction we’re moving regardless of the system’s rotation.

Now we’re going to create a second module to set parameters, it’s important to separate them so we control the order in which these happen, otherwise they won’t update at the right time regardless of their order inside the module.
In this fresh module we will update the LastPosition with the current Engine Owner Position.
And we’ll Remap the Z value of TravellingDirection so the input minimum is -1.
Second lets create our rotating slimes.
Make sure your System’s and Emitter’s loop duration matches or you’ll be seeing some hiccups.
Starting by an empty emitter I’ll make it loop once with an infinite loop behavior, add a Spawn Burst Instantaneous module set to 3 particles, and a Mesh Renderer – I’ll be using regular spheres for this breakdown.
Then we add a Rotate Around Point module in our Particle Update.
Because we want them to be evenly spaced depending on number of particles we will set the Rotation Phase to Normalized Exec Index and turn off the including one tick.
In Rotation Rate I’m setting it to our System parameter named Speed with a Lerp to set how fast it spins.
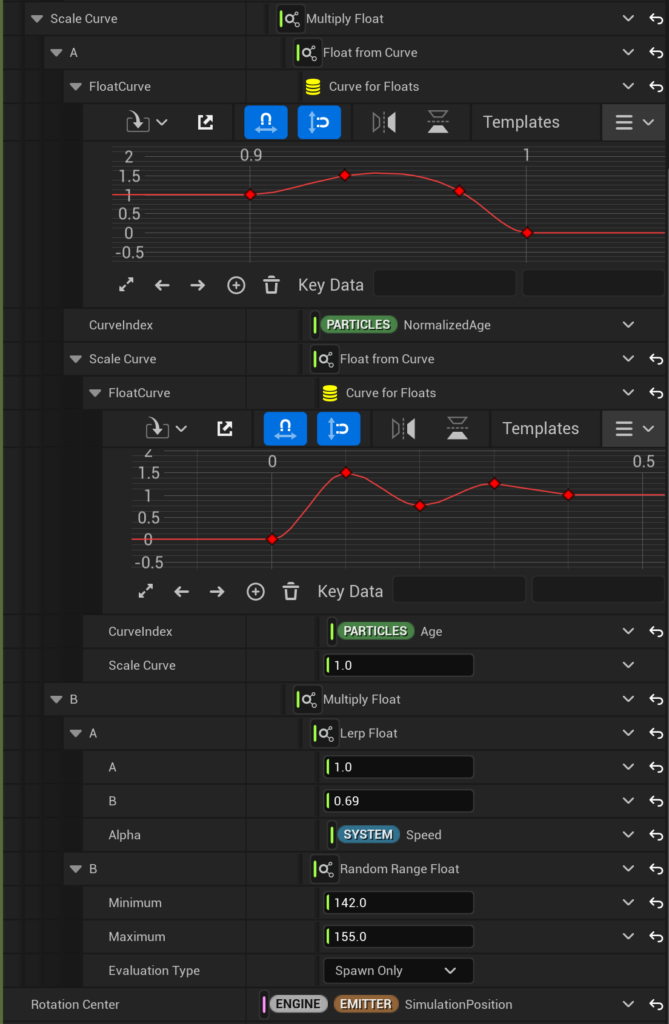
Now moving on to the Radius we will stack a few curves. Lets start with one Float from Curve that will add some slight variation so it’s not perfectly circular, mine starts and ends in 1 with a 0.15 variation down and up in between. Not super visible but it does add to the organic feel imo – for further optimization you could skip this step and start with the next curve instead, all these curves we’re adding are going to be multiplying each other. In order to see what you’re doing at this point add a larger number into the Scale Curve value like 150 (depends on the scale of your meshes).
In Curve Index I’m adding a random float to the Normalized Age so that each particle follows a different path.

Now Scale Curve I set to Multiply Float. In A we will set the ease in and out, in B we’re setting the actual radius.
So the first curve in A will set the behaviour of the position as it comes to an end. The curve starts at 0.9 (time) with a value of 1, goes a bit higher up to have this elastic feeling and then smoothly goes to zero once time reaches 1. This Curve Index needs to be a Normalized Age but you might want to try a slightly different approach if the life of your particles is particularly long. The second curve (in the Scale Curve parameter of the first curve, which is a simple multiplication) will set the ease-in; starts at 0 both time and value, at 0.1 seconds it goes to 1.5 value, then 0.2s down to 0.75, at 0.3s to 1.25, and ending with a value of 1 at 0.4s. This curve will have a Curve Index of Age, since this gives us much more control on the length regardless of the lifetime of the particles.
In the B value we’ll do another Multiply Float so we can have a Random Range Float to have them be sliiightly different, and a Lerp Float that is controlled by our Speed System parameter to add a bit of inertia feel to it.
Then Rotation Center set to SimulationPosition.
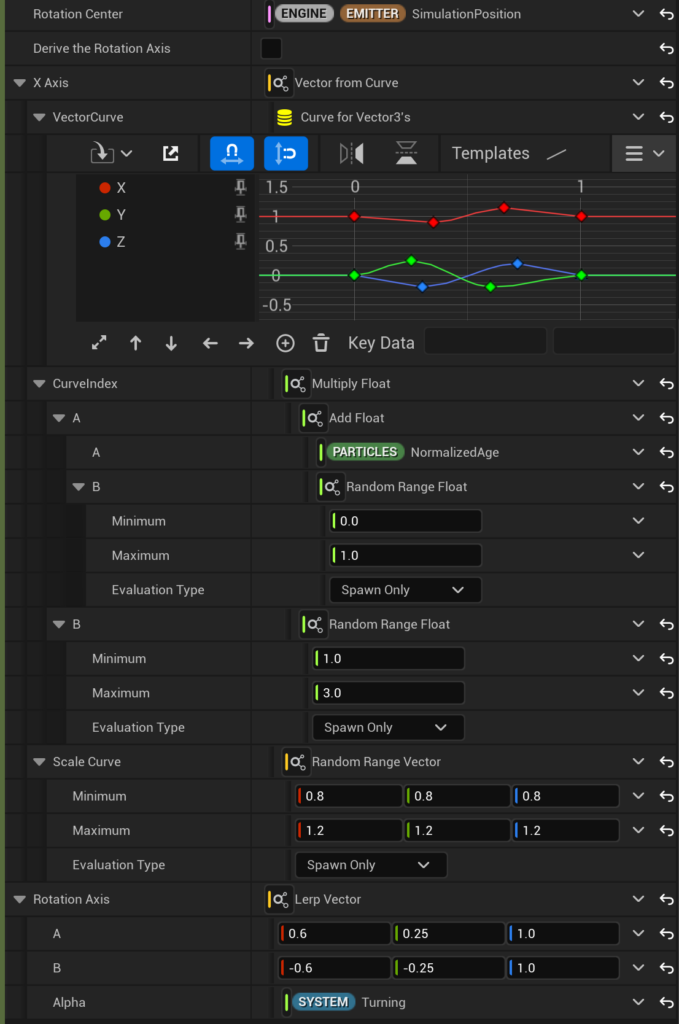
As a last step for our Rotate Around Point module we will turn off the Derive the Rotation Axis tick at the bottom so we can set our Rotation Axis manually and set our X Axis.
X Axis will be a Vector from Curve, this will have our system wobble from side to side a little bit to help give it a more organic and less stiff feel as well as help us tilt our system as we are turning to a side.
For its Curve Index I’m doing a multiplication of a random 1 to 3 float with an addition of the NormalizedAge and another random float. The addition of the random is so the particles aren’t perfectly synchronized in time and the multiplied one is for extra variation of timing.
The Scale Curve I’m setting to a random vector between 0.8 and 1.2. As you notice the wobbliness of the curves isn’t too big so they will still look like they move “together” but with some subtle individuality, adds to the playfulness of the particles behaviour.
Now for Rotation Axis we set a Lerp with Turning as our Alpha, the vector values will vary depending on how much you want it to tilt and in which direction, depending on the speed.
Next we add an Update Mesh Orientation module so we can have the meshes always looking forward:
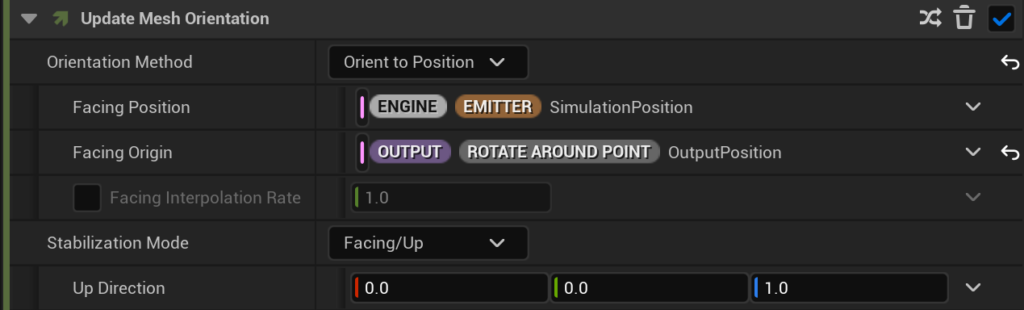
We’re using the Output Position from the Rotate Around Point module as the facing origin to use that rotation. I’ll be using some duckies to demonstrate, in my case I had to change the rotation in the Mesh Rendering settings.
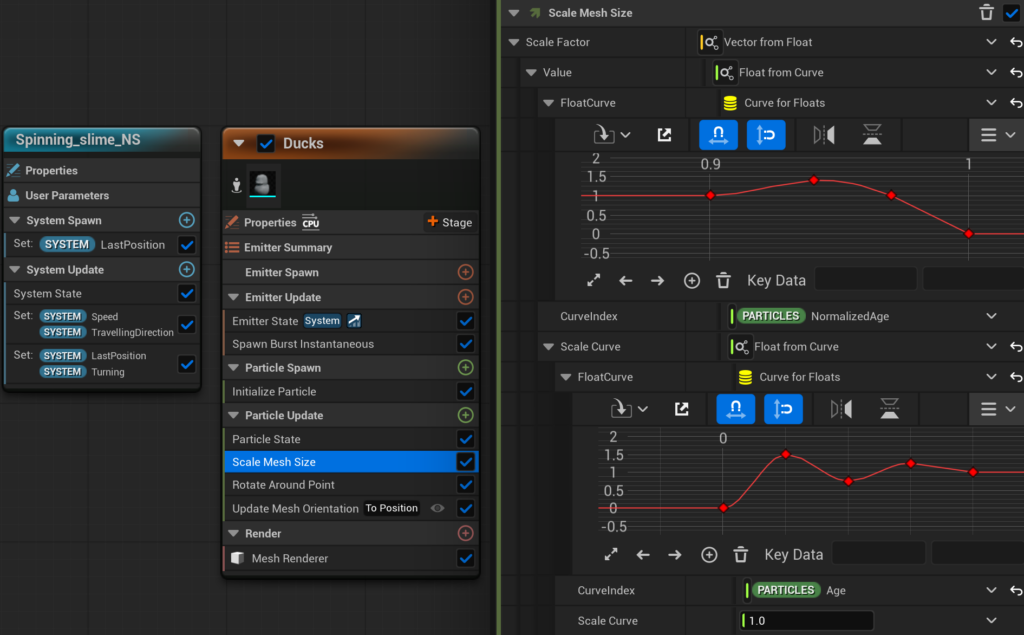
And a Scale Mesh Size module with a Vector from Float set to a Curve and we’ll do basically the same thing we did in the Radius of our Rotate Around Point module so that the size can ease in and out.
So at this point we have our particles rotating and reacting to the system’s movement if we drag it around. This doesn’t look great when we move it manually, it works better with a controller movement, I’ll be using Unreal’s third person starter content examples and just add this system to BP_ThirdPersonCharacter, I’m adding the system as a child of the CharacterMesh and hiding this Character.
I’m also adding a sprinting key to be better able to visualize how my speed affects my system without needing a game-pad.

This needs the particle system to not rotate at all, as it uses the velocity of the system to rotate itself. This BP setup I’m using is just for testing purposes so the controller will be a bit wonky if you turn with the buttons instead of just rotating the camera by moving your mouse. Also excuse the low quality of the video, managed to compress it to 550kb and for some reason it was getting those lines while recording, Unreal doesn’t seem to work very well with Linux unfortunately, but you get the idea of what it should look like at this point.
That’s the meat of this system, the rest is beautifying it. Depending on how it’ll be controlled you might want to add a Spring Force module.
So now you’d add a Generate Location Event module and use it to spawn the trails and droplets, which would then have a Generate Death Event module to spawn the decals on the floor. Some flares for the spawning and death of them as they shrink into the center.
And there you have it folks!